We’ve set up Revolution Pi as an open source project because we would love to see you all as a community pushing this project forward. This is why we will publish the circuit drawings, important mechanical data and source codes. You will even be able to buy all the mechanical parts needed to build your own modules and integrate them into the Revolution Pi family.
Here are the facts:
- Self-made drivers or applications easily have access to the process image and thus can exchange their data with other applications.
- Self-written “RevPi Adapter Profile”-files (RAP-files) enable you to integrate self-made modules or drivers (=adapters) into the adapter tree-view of PiCtory (our graphical configuration tool).
- Memory addresses in the process image are dynamically assigned by PiCtory also for self-made adapters.
- Possibility of value assignment for pre-configured configuration data of self-defined adapters in PiCtory.
- Possibility to build your own modules with PiBridge communication because all needed mechanical parts are available in our shop.
When starting our shop you will get a “maker’s set” there. This set will contain all necessary parts to build your own RevPi module which are not available in other shops. We’re sure the community is hot to learn about your project (there will be a forum at our internet platform soon).
So what does this set contain?
- Case half shell left and right
- Front lid (closed with only 6 light conductors for LEDS)
- Closed lid for upper contact slid
- 6 fitting SMD duo-LEDs (red and green)
- PiBridge pin header (THT) with plug
- Supply current header (THT) with plug
You will find mechanical data for a fitting PCB on the internet platform and of course the modules source code needed to run the PiBridge. With few additional parts which can be ordered at any online shop you will be able to build your very own DIY module. It will cyclically exchange its data with RevPi Core (which is done by our central driver PiControl). But to enable PiControl to do this job it needs information collected by PiCtory.
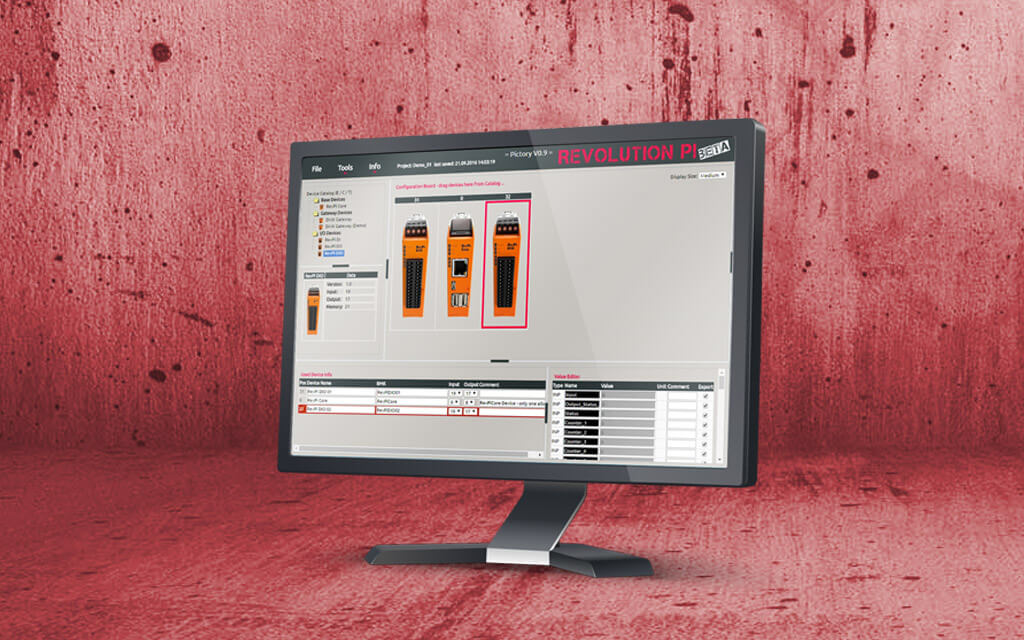
Administering your self-made adapter in PiCtory
We’ve explained our graphical configuration tool in our last blog post. In this browser application all known modules or drivers (we generally call them “adapters”) are displayed in a tree-view. You simply drag and drop adapters from this tree-view to the workspace (also repeatedly) and arrange them just like they are mounted on the DIN-rail. Adapters which are not mounted on the DIN-rail can be drag and dropped to a special workspace area. Marking an adapter on the workspace opens its list of inputs, outputs and configuration parameters in a separate window part. You can change the name of these elements to be different from the default. You may change initial output values for the outputs and you can set the values for each configuration parameter.
“RevPi Adapter Profile“-File (RAP-File)
In order to see your self-made adapter in the tree-view of all known adapters you will have to write a RAP-file for this adapter and place it on the eMMC disk of the RevPi Core. This file has JSON format which will be published in detail. It simply collects all information necessary for PiCtory to correctly display the adapter and its elements. Additionally you need to provide a picture and an HTML description of the adapter on the disk.
Besides this adapter main data the RAP file contains a list of all inputs, outputs and configuration parameters, including their default names and values. The list of course also contains the data type of each element which defines its length in bytes which will be reserved in the process image for this element. Of course you can define enumeration types for drop-down lists (using string definitions).
As soon as such a RAP file with valid format is found by PiCtory during start-up you can use its adapter like any adapter made by KUNBUS. PiCtory will write the needed memory space of central process image into the RSC file (“RevPi Sytem Configuration”, JSON).
Runtime
At RevPi Core side you don’t need to write any driver software for a DIY PiBridge module. Our central driver PiControl will recognize the module during start-up and will assign memory space in the process image and cyclically exchange the data according to data defined in the Rap file and written to the RSC file. Any application can then access this data and may even use the symbolic names for in- and outputs defined using PiCtory.
If you write your own driver as an adapter (e.g. to use a transceiver connected by USB) you need to get its configuration values prior set up using PiCtory. You get access to this data during start-up in the same way you would retrieve input data from the process image (see example code in our last newsletter): Just copy the configuration data of your driver by using an ioctl()- call with parameter KP_GET_CONFIGDATA and the address of the adapter. It’s so simple because we store configuration data just like process data. We only use a special reserved area of the process image which is not used by cyclical data transfers.
We’re looking forward to learn about your DIY project!
Hi,
this sounds great!
I will be trying to implement the Revolution Pi into a touchscreen-based training device for pets and captive animals with fluid reward and audio feedback.
I will start working on it next year, so for now I am only reading the updates of the Revolution Pi, without actively building / coding / programing.
thanks
Antonio
Hi Antonio,
Welcome to Revolution Pi. This seems to be a really cool project you’re working on! I would love to see details and results being published for the community. We will have our forum online soon, so please keep reading the news…